Showing posts with label Recipe

Happy Fall my friends! I simply adore this season for so many reasons. The crisp mornings, being able to turn off the AC and open up all the windows in my home to welcome in all that fresh air goodness, settling into a more home-centric routine, and of course- baking! I’ve already started my baking season off on the right foot by baking up a batch of tasty cast iron skillet butter-topped drop biscuits and I wanted to share the recipe with you. These were some of the easiest biscuits I’ve ever made.


Biscuit Goodness:


Cast iron skillet butter topped drop biscuits

Cinnamon Banana Bread Recipe

in , , , , , , , , by Linda A Kinsman, Tuesday, October 16, 2018
The temperatures are starting to fall here in middle Tennessee and I’m so ready for all things fall! This is a nesting season for me and lots of you I’m sure, which means I’ll be talking more about cleaning, cooking, decorating and baking! My oldest daughter was home for fall break this past weekend, and we had planned on baking pumpkin bread, so as I hurried through grocery shopping, I picked up a can of regular pumpkin. Or so I thought. Read on to see how this oops became a tasty recipe and a lot of fun!

Cinnamon Banana Bread:


Cinnamon Banana Bread recipe
I love receiving homemade gifts any time of year, but most especially on Mother’s Day.  We are a family of traditions and one that I adore is having the kids serve me breakfast they made themselves. When they were little, Daddy helped of course; but as they got older they wanted to take on more of the responsibility.  I’ve been served everything from toast with jam to chocolate covered strawberries. I know my daughters would love whipping up this simple Blueberry loaf recipe from celeb chef Zipora Einav for me. Baked goods make a perfect Mother’s Day gift!


Blueberry Loaf - a perfect homemade Mother’s Day gift:


Blueberry Loaf #recipe by chef Zipora


February has finally arrived, which is cause for celebration for so many of us.  There is just so much to look forward to and celebrate this month. For those fortunate enough to live in warmer regions, you may start feeling the call of spring by the end of this month. Then there’s love to celebrate in its many forms on Valentine’s Day and a whole new line up of drivers will be greeting us at  Nascar's Daytona 500 on the 18th. Today though, we are talking about appetizers for the BIG GAME! Are you ready for some football this Sunday? Here are some tasty crowd-pleasing Jalapeno Cheddar Bacon wafers we whipped up recently that are a perfect game day appetizer.  

Jalapeno Cheddar Bacon wafers


Jalapeno Cheddar Bacon wafers, a perfect game day app

In an effort to shake up dinner time here, I’ve been giving some of my staple recipes a creative twist. Sometimes I’ll add a different sauce or vegetable; or I’ll try a different cooking method. When I received a lovely assortment of Parmigiano Reggiano as part of a blogger ambassador program, I knew I had to make something that would allow the “King of Cheese” to shine! I think I was successful with my Parmigiano Tomato and Spinach Tortellini Salad Recipe.   I’m happy to I’ll share it and some interesting facts about Parmigiano Reggiano and their sweepstakes with you today.


Parmesan Reggiano tomato and spinach Tortellini salad Recipe #sponsored

My daughters and I are in the midst of planning their graduation parties. In May, my oldest will graduate from high school and my youngest will graduate from middle school. While both are causes for celebration on their own, my girls have decided to have a combo BBQ/Bonfire with both sets of their friends. That means cooking good food and lots of it, but we don't mind that.  You can’t have a BBQ without serving salads, so I’m going to make this tasty no mayo potato salad recipe I’ve been perfecting for a decade. I think you are going to like my pan seared potato, bacon and green onion salad as much as we do!


Pan seared potato bacon and green onion salad recipe


We are in the home stretch, friends! With Christmas just 5 days away, I thought it was the perfect time to share an easy, tasty cookie recipe that doubles as a great last minute hostess gift or a special show of appreciation to a teacher, bus driver or neighbor. 


Peanut butter toffee cookies make perfect gifts #recipe


I love baking from scratch whenever I can, but sometimes this busy work-at-home mom needs to streamline the baking process, too and that’s when I turn to premade cookie mixes. Mixes like Betty Crocker's help me keep calm and whip up a batch or two of these easy Peanut Butter Toffee cookies in no time. Trust me when I say, these cookies are so quick and delicious, nobody will believe they aren’t from scratch!


Here’s my quick and easy recipe for Peanut Butter Toffee Cookies. 


Ingredients:


  • 1) 17.5 ounce peanut butter cookie mix
  • 1) 8 ounce bag English toffee bits (found in baking aisle of most grocery stores)
  • 3) Tablespoons vegetable oil
  • 2) Tablespoons water
  • 1) Large egg


easy peanut butter toffee cookies you'll love to give #recipe


Directions:


  • Preheat oven to 375 degrees and line cookie sheets with parchment paper. In large bowl mix oil, water and egg in peanut butter cookie batter until no longer grainy.
  • Gently fold in toffee bits.
  • Shape dough into 36 small balls or make drop cookies like I did by gently sliding off tablespoon-size dough balls onto parchment paper.
  • Bake cookies for 8-10 minutes for regular size cookies, or 9-11 minutes for large cookies.
  • Allow to cool.


If you are giving cookies as gifts like I am, get your cookie container ready while the cookies cool. I prefer using Ziploc containers because they are sturdy and reusable, which truly comes in handy this time of year! Sometimes, I even receive my container back with a goody inside as thanks

easy peanut butter toffee cookies you'll love to give #recipe


I’ve found that a dozen cookies fit perfectly in the 1.25 quart size plastic containers. Sometimes you can get lucky and find the holiday containers, but if not, you can decorate your container as festively as you want.  It really is a simple and easy way to spread kindness and cheer at this special time of year!


I hope you enjoy these cookies and all the joy that this, the most wonderful time of the year, brings.


Merry Christmas from middle Tennessee!

Merry Christmas from us to you!


Hello from Tennessee Titans territory! Are you ready for some football this Sunday? We are heading into week six of seventeen and our Titans are starting to come together after a nice win last weekend!I thought it was a good time to show our team some love and share this great recipe my husband I came up with for the super bowl last year. Our hearty buffalo blue cheese dip is our take on the classic entrée, it’s a dip that eats like a meal and is easier to clean up after. 


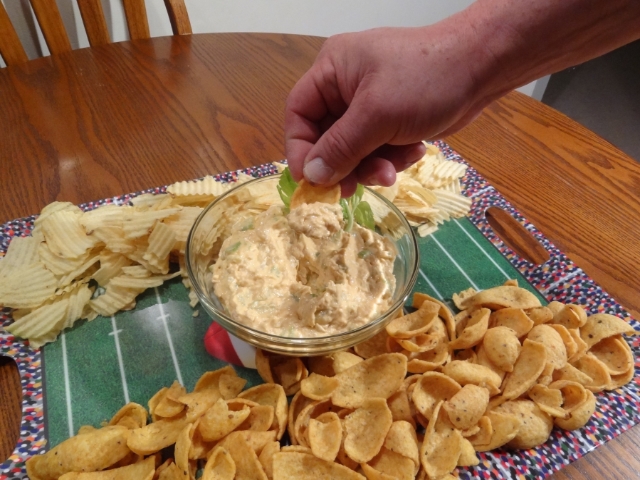
Hearty buffalo blue cheese dip recipe


Doesn't this look tasty? Here's what you'll need to add to your shopping list: 


Ingredients:

 Makes 3 cups

  • 1 Large can of Chicken Breast meat in water
  • ¾ jar  Blue Cheese Dressing
  • 2 tablespoons (or more to taste) Cayenne based Hot sauce (think Tabasco®, Franks® or Texas Pete®)
  • 1 cup celery, diced small (reserve celery greens for garnish)
  • 1 package Neufchatel Cheese or softened Cream cheese


Hearty Buffalo Blue cheese dip recipe


Directions:

In large mixing bowl, mix all ingredients together until Chicken breast meat is broken apart and ingredients mixed in.
Garnish with celery greens and chill for at least an hour before serving.
Serve with your favorite chips, crackers, carrots, celery sticks or any dip-able veggie.


Serve hearty buffalo blue cheese dip with corn chips #football


My husband loves this dip best with big dipper corn chips and celery sticks. He’s requested it for this week’s game and since it takes just 5 ingredients and about 10 minutes to make, I’m happy to oblige his request! Another great thing about this recipe is it is easy to double, or even triple the serving amount to feed a crowd!


Whether you watch the game from home, or are heading out to do some tailgating, try making and serving our Hearty Buffalo Blue Cheese Dip. It really is perfect football fan food!


Do you watch football games with your family? Do you have a favorite NFL team, or do you enjoy college games more? Please let me know in comments!


I made these tasty cheesy sausage bites last year for Thanksgiving and wished I’d discovered the recipe sooner in the year for all the fun fall tailgates, potlucks and picnics happening from September on.

They were such a crowd pleaser! I had several family members ask me to make them for this Thanksgiving too, but I didn’t want to wait that long.  Now that the nights are getting cooler, I’m in the mood for tasty, oven baked goodies! Today I’m sharing a simple recipe I’ve adapted from a Pillsbury recipe. I think you’ll love taking these cheesy sausage bites to your next tailgate or family get together too. 


Cheesy Sausage Bites recipe, perfect tailgate food!


With only 5 ingredients, it’s easy to add what you need to your shopping list and these bites are easy on the budget too! 


Ingredients:

Makes 40 bites (depending on size of bite you make)

  • 1 pound Roasted Red Pepper Sausage (or any bulk sausage flavor you like)
  • 2 cups (8oz.) shredded sharp cheddar cheese
  • 1 can (8oz) Pillsbury Crescent dinner rolls (choose your favorite brand)
  • 2 tablespoons all-purpose flour
  • ½ teaspoon dried rosemary leaves, crushed


Cheese and sausage for recipe


Directions:
  • Preheat oven to 375 degrees. Line a cookie sheet with foil. Spray foil with cooking spray, set aside.
  • Cook sausage on medium heat until just brown, drain and put in mixing bowl.
  • Add cheese and rosemary to bowl and mix with hands or spoon.
  • Unroll crescent dough onto floured work surface; coat each side of dough with flour.
  • Cut dough into about ¼ -inch pieces with a pizza cutter or knife.
  • Mix crescent dough pieces into bowl of sausage mixture in small amounts until well blended.
  • Shape mixture into 40 inch sized balls. Place on pan.
  • Bake 15 to 18 minutes or until golden brown.


Fresh from the over Cheesy Sausage Bites


My Cheesy Sausage bites recipe takes about 45 minutes to make from start to finish, but are well worth the time. They taste fantastic straight from the oven or room temperature. If your family is a fan of finger foods, you’ve got to try these sausage bites. 

Another great thing about them is you can make them two or three days ahead of time because they store well in the fridge. I just lined a large plastic container with a paper towel and put in the fridge and watched the amount of sausage bites dwindle as my family snacked on them.


Please share in comments: What is your favorite fall tailgate food? Do you make it, or does a friend or family member bring it?


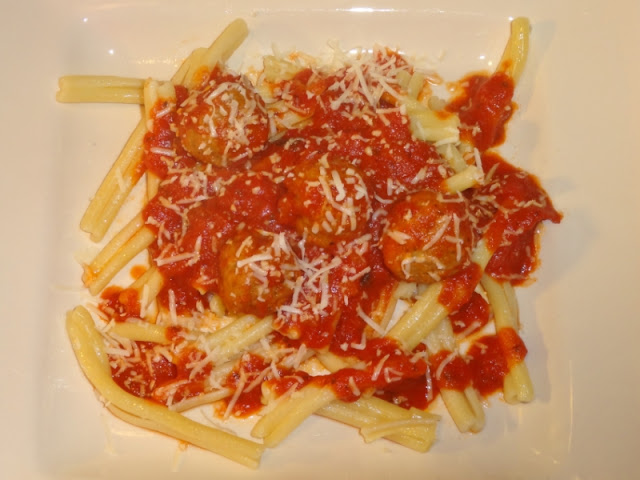
Pasta is a passion with my family and is on heavy rotation at our dinner table.  When we shop, we’re on the lookout for unique pasta shapes to try at home and when dining out, at least one in our family of four will order a pasta dish.  My husband and I enjoy recreating favorite pasta dishes at home so last night I made a favorite to warm up my family- Caserecce pasta and Red Sauce. I even added some meatballs for good measure.  Thank you to Ragu for sponsoring today’s post and inspiring me to pass on my family traditions.

 Warm up with Caserecce Pasta & Red Sauce #recipe #simmeredintradition


You’ll find Caserecce Pasta and Red Sauce on many restaurant menus, but don’t let that intimidate you. With a planning and a good Red sauce like Ragu, you’ll be serving up smiles in no time! Here’s my list of ingredients for you to make a shopping list from.

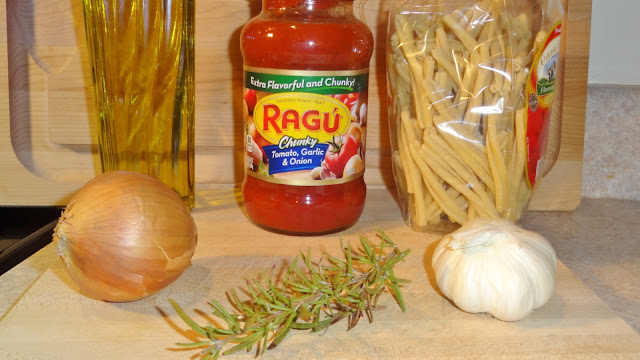
Ingredients to make Caserecce Pasta & Red Sauce #recipe


Ingredients: Serves 6

  • 1 container Caserecce Pasta
  • 1 small white or yellow onion
  • 1 large clove garlic
  • 2 tablespoons olive oil
  • 1 tablespoon fresh Rosemary
  • 1 teaspoon salt
  • 1 teaspoon fresh ground black pepper
  • 2 24 ounce Ragú Red Pasta Sauce. (I used Chunky Tomato, Garlic & Onion) 
  • 1 pound Italian style meatballs (optional)
  • Freshly shredded Romano or Parmesan to garnish (optional)

Directions:

In a large skillet, add olive oil on medium heat until warm. Add onions and minced garlic and sweat until onions are translucent. When my family smells this, they know I'm cooking up something good! 

Sweating onions and garlic

Meanwhile, in large pot, bring water with a drizzle of oil of your choice and a pinch of salt to boil. Once boiling, add pasta and cook according to package directions.  As with most pasta dishes, Caserecce is best served Al dente.  


Once your onions and garlic are ready, add your Ragu pasta sauce. I usually put just a little water in the jars to get out every last bit of sauce and stir it in along with the salt, pepper and Rosemary.  Let your sauce simmer for about 6 minutes, then add your meatballs. You can either add meatballs you’ve made, or pre-made meatballs now, just make sure they aren’t frozen.

The making of a good red sauce with Ragu #simmeredintradtion

The great thing about using Ragu red sauce is that it has such a great flavor, it doesn’t require any fussing with. My pasta dishes turn out perfectly each time.  Assunta Cantisano, the founder of Ragu; sure new what she was doing with her recipe when she started out way back in 1937! This sauce is truly #simmeredintradition and I’m proud to serve it to my family and friends.  Plus, as a work at home mom and entrepreneur, I was fascinated to learn about her and this beloved brand. I invite you to read her story here

Continue to simmer your sauce while you make your sides. 

Simmering red sauce for pasta

I usually serve sourdough garlic bread and a large salad with my Caserecce Pasta & Red Sauce, but this dish also pairs well with roasted vegetables or whatever you have on hand.  

In less than 50 minutes, you’ll be serving up a hearty meal that will warm your family from the inside out and just may start a new tradition of serving pasta often as well. 


Mangia!


Please share in comments: What is your favorite pasta in red sauce dish? Is this a family recipe that's been handed down to you? 


Once I’ve served Thanksgiving leftovers at least twice, I feel comfortable turning my attention to all things Christmas and that means decorating and baking cookies! I love baking from scratch whenever I can, but sometimes this busy work at home Mom needs to streamline the baking process and that’s when I turn to Betty Crocker Cookie mixes. This week, I’m spreading holiday cheer with my Peanut Butter Toffee Cookies that started with a Betty Crocker mix. These cookies are so quick and delicious; nobody will believe they aren’t from scratch!


baking, holidays, cookie, season, peanut butter, toffee, cookies


I bake cookies often throughout the year, but at Christmas time, I’m baking like a boss all season long. I bake for family and friends, I bake for cookie swaps and teacher   appreciation days at my daughters’ schools and I bake cookies to give to my neighbors.

 It really is a simple and easy way to spread kindness and cheer at this special time of year. All you need is a Betty Crocker Cookie Mix, about an hour and a few Ziploc containers to put your cookies in.  I chose peanut butter because I knew it was a favorite ; but Betty Crocker has plenty of options like Sugar Cookies, Chocolate Chip and Double Chocolate chip just to name a few.  Both the mixes and the Ziploc containers are on sale right now at Publix, so be sure to visit readysetsave.com to download your digital coupons. Be sure to check out all the fun holiday recipes there too! 


Here’s my quick and easy recipe for Peanut Butter Toffee Cookies. 

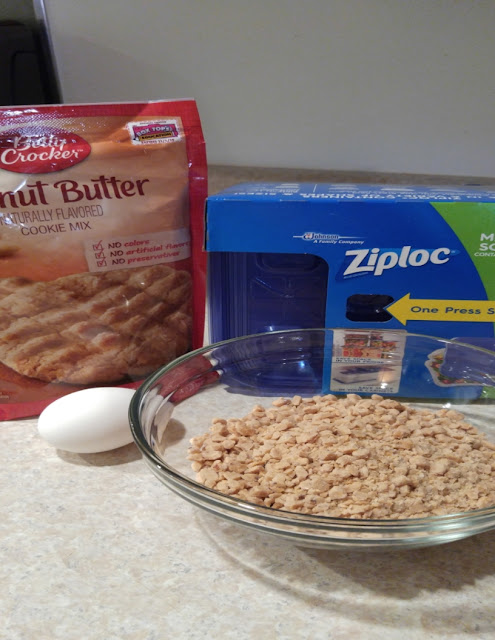
Simple ingredients to make Peanut Butter Toffee Cookies


Ingredients:


  • 1) 17.5 ounce Betty Crocker Peanut Butter Cookie Mix
  • 1) 8 ounce bag English toffee bits (found in baking aisle of most grocery stores)
  • 3) Tablespoons vegetable oil
  • 2) Tablespoons water
  • 1) Large egg


Directions:

  • Preheat oven to 375 degrees and line cookie sheets with parchment paper. In large bowl mix oil, water and egg in Peanut Butter cookie batter until no longer grainy.
  • Gently fold in toffee bits.
  • Shape dough into 36 small balls or make drop cookies like I did by gently sliding off tablespoon size dough balls on to parchment paper.
  • Bake cookies for 8-10 minutes for regular size cookies or 9-11 minutes for large cookies.
  • Allow to cool.


If you are giving cookies as gifts like I am, while the cookies cool, it’s time to get your cookie container ready. I prefer using Ziploc containers because they are sturdy and reusable, which truly comes in handy this time of year! Sometimes,  I even receive my container back with a goody inside as thanks. 


Put baked cookies in a Ziploc container for sharing


I’ve found that a dozen cookies fit perfectly in the 1.25 quart size Ziploc containers. Sometimes you can get lucky and find the holiday containers, but if not, you can decorate your container as festively as you want. 


Label your cookies for gifting with a simple festive tag

Win it!


Thanks to my sponsor, Betty Crocker, one lucky reader will receive a $10.00 PayPal cash transfer so you can purchase some cookie mixes too! 


Terms: 

No purchase is necessary to enter using the Rafflecopter from below.  My WAHM Plan is  responsible for prize fulfillment. Winners will be notified by email used on entry form and have 48 hours to respond or another winner will be chosen.  This giveaway is not associated with nor endorsed by Facebook, Twitter, or any other social channel. You must have a PayPal email account to enter. 

Good luck!


a Rafflecopter giveaway

With Thanksgiving just a couple of weeks away, my family and I are talking food, family, and fun. We’re planning our meals, which will have our traditional favorites as well as a table full of appetizers. 
Each year when our families get together there is one delicious appetizer that all of us rave about and it then becomes a tradition too. 

This year, I think I just might be making a new family tradition when I serve my Cheesy Sausage Crescent Bites! These heavenly bites of yumminess all started with a simple Pillsbury Crescent dinner Roll recipe that I modified a bit. I think you’ll enjoy them as much as my family has and may want to #ThanksgivingWithPillsbury too!


Cheesy Sausage Crescent Bites


Cheesy Sausage Crescent Bites #recipe on mywahmplan.com


Serving up warm from the oven Pillsbury Crescent dinner rolls or buttermilk home-style biscuits is a given during the holidays and I’m happy to share that they are both on sale at Publix just in time for you to stock up. Go to readyplansave.com and upload the coupons to your loyalty card. If you don’t have a local Publix, be sure to check your newspaper coupons. I usually find Pillsbury coupons in my Sunday paper. 


Pillsbury Crescent dinner rolls #ThanksGivingWithPillsbury

 Here’s the list of ingredients you’ll need.


Ingredients:


Makes 40 bites (depending on size of bite you make)

  • 1 pound Roasted Red Pepper Sausage (or any bulk sausage flavor you like)
  • 2 cups (8oz.) shredded sharp cheddar cheese
  • 1 can (8oz) Pillsbury crescent dinner rolls
  • 2 tablespoons all-purpose flour
  • ½ teaspoon dried rosemary leaves, crushed
 

Sausage and cheddar cheese #yummy


Directions:


  • Preheat oven to 375 degrees. Line a cookie sheet with foil. Spray foil with cooking spray, set aside.
  • Cook sausage on medium heat until just brown, drain, and put in mixing bowl.
  • Add cheese and rosemary to bowl and mix with hands or spoon.
  • Unroll crescent dough onto floured work surface; coat each side of dough with flour.
  • Cut dough into about ¼ -inch pieces with a pizza cutter or knife.
  • Mix crescent dough pieces into bowl of sausage mixture in small amounts until well blended.
  • Shape mixture into 40 inch sized balls. Place on pan.
  • Bake 15 to 18 minutes or until golden brown.


Cheesy Sausage Crescent Bites


These Cheesy Sausage Crescent bites take about  45 minutes from start to finish but are well worth the time. They taste fantastic straight from the oven or at room temperature. If your family is a fan of finger foods, you’ve got to try these! Be sure to check out my other recipes by using this tab


Please share in comments: What is your favorite finger food to serve during the holidays?


By the Labor Day weekend, my family and I are ready to switch up our dinner fare and start adding some of our fall favorites to the menu. My family loves my classic Turkey Tetrazzini that I make with leftover Thanksgiving turkey, so when my husband smoked a turkey breast for our holiday, I decided to make turned up Turkey Tetrazzini as part of the #PublixFlavorExcursion, which showcases several brands my family loves. 


 My WAHM Plan: Turned up Turkey Tetrazzini recipe


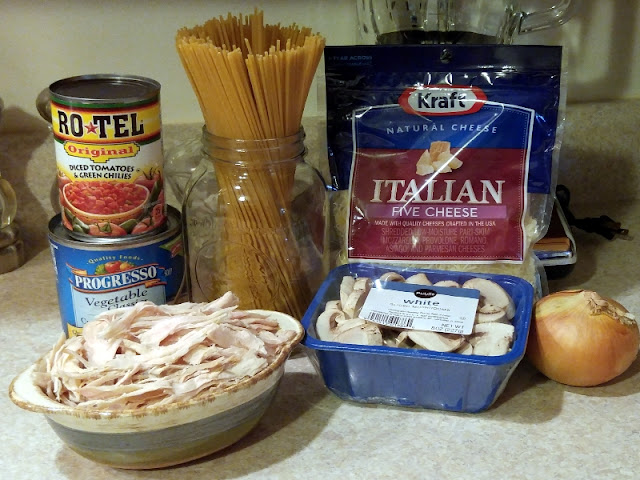
The great thing about making this Tetrazzini dinner is you may already have several of the key ingredients on hand. I was fortunate enough to have ample left-over turkey for my dinner, but you can purchase deli turkey for this recipe and shred it too. Here’s what you’ll need to make this tasty and quick dinner.

Ingredients:

My WAHM Plan: Ingredients for Turned up Turkey Tetrazzini


Makes 6 servings


Directions:

Cook pasta according to package directions. Add olive or canola oil to large skillet on medium-high heat. Add onion and cook for about 3 minutes, or until softened. Add mushrooms and cook for about 5 minutes, until mushrooms are lightly brown and fork tender.


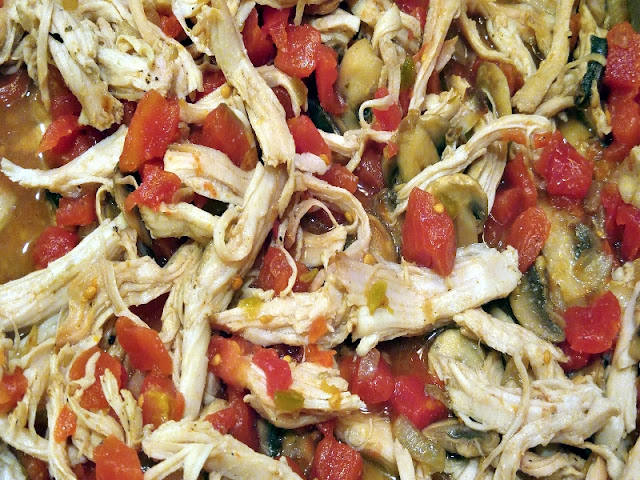
Next add Turkey, undrained tomatoes, soup, water, milk to skillet. Add salt and pepper to taste, stir to combine all ingredients. Heat until mixture is hot, and then simmer until pasta is done. Add half the cheese to skillet to melt. Drain cooked pasta and add to skillet. Gently mix all ingredients until pasta is covered. Top with remaining cheese. 

I served my Turned up Turkey Tetrazzini with French-style green beans and sourdough cheesy-garlic bread. This dinner was ready and on the table in just 40 minutes and my family loved it saying it was different in a good way. They really enjoyed the slight heat from the Ro*tel green chilies. If you love heat like I do, you can take it up a notch by adding pepper flakes to your serving.


My WAHM Plan: Ro*tel green chilles gives this dish its kick


Win It:

 This giveaway is sponsored by #PublixFlavorExcursion and participating brands because they want to help you take a culinary trip from your everyday menu! Entering is easy using the Rafflecopter form below.

Terms:
No purchase necessary to enter. Open to U.S. residents who are 18+ years or older. My WAHM Plan is responsible for prize fulfillment. Winners will be notified by email used on entry form and have 48 hours to respond or another winner will be chosen.  This giveaway is not associated with nor endorsed by Facebook, Twitter, or any other social channel.


Good Luck! 

a Rafflecopter giveaway


Disclosure:

My thanks to Publix and participating brands for sponsoring today's recipe.I received  monetary compensation for my thoughts, however, I only share content I feel will benefit my readers. I’m disclosing this in accordance with the FTC’s 16 CFR, Part 255: “Guides Concerning the Use of Endorsements and Testimonials in Advertising”


I can still remember it like it was yesterday- the diaper bag and my purse never left home without a fresh supply of Original Cheerios when my girls were little ones. Fast forward a decade and I’m still serving up Cheerios for snack time.  I don’t put them in my purse as often as I used too, but Cheerios are still a favorite part of snacking here. My kids cheer and thank me when greeted with this yummy after school Cheerios Trail Mix snack.  


My WAHM Plan: Cheerios for after school snacking #giveaway


Cheerios have always been more than just breakfast food here at our house. From mid- morning snacks, to night time noshing, Cheerios add just the right amount of crunch without being overly sweet or salty. We prefer Original and lightly Frosted Cheerios for our snacking, but Cheerios comes in more yummy flavors like:
  • Honey Nut
  • Banana Nut
  • Multi-Grain
  • Multi-Grain Peanut Butter
  • Apple Cinnamon 

My daughters almost picked Banana nut flavor on out last trip to Publix because Cheerios are on sale right now as BOGO’s. Who doesn’t love a good sale on a household staple like Cheerios? The sale runs August 13 through September 2, so you have lots of time to stock up like we did. Once I told them I’d make my Cheerios Trail Mix, in the Frosted and Original boxes went in the cart. 


Cheerios Trail Mix Recipe:
Makes 3 cups.


Cheerios Trail Mix recipe on MyWAHMPlan.com


Ingredients:
  • 1 cup Original Cheerios
  • 1 cup Frosted Cheerios
  • 1 cup Mountain trail mix. (Mine has raisins, peanuts, almonds, cashews and chocolate). Feel free to raid your pantry for trail mix items and add your kid’s favorites.
  • 1 gallon zipper close baggie


Directions:

In zipper baggie, pour in Cheerios then Mountain Trail mix, or one cup of your own ingredients like raisins and nuts. Close bag and gently mix all ingredients. Pour into a medium sized serving bowl and set on the table for after school munching!
The great thing about this trail mix snack as it can double as a breakfast cereal or to go breakfast in a bag if you are running late! 

Cheerios Trail Mix recipe on MyWAHMPlan.com

Looks good doesn’t it? It really is so quick and easy to whip this up and have it waiting for your kids after school.

Does your family love Cheerios too? I invite you to head on over to Cheerios.com for more tasty recipes and to learn more about the Cheerios products. Be sure to download or print out your BOGO coupons so you can stock up while shopping at Publix too.

If you’ve been reading my blog for long, you must know how much I love working with Publix on their campaigns, especially food ones because they want to help us save on brands we know and trust, like Cheerios. I appreciate both companies as my sponsor of today’s post and this giveaway!


Win It!

One lucky reader will receive a $10.00 PayPal transfer! I hope that you’ll shop and save on Cheerios at Publix with your winnings, but if you don’t have a local Publix store, perhaps you’ll buy a box of Cheerios anyway.

Terms:

No purchase is necessary to enter using the Rafflecopter form.  My WAHM Plan is responsible for prize fulfillment. Winners will be notified by email used on entry form and have 48 hours to respond or another winner will be chosen.  This giveaway is not associated with nor endorsed by Facebook, Twitter, or any other social channel.

Good luck!


a Rafflecopter giveaway
By August, our family meal plans have fizzled and we all are getting a bit bored with the same dinner fare. That’s why last week, I decided to go old school and serve up tasty tacos on, you guessed it! Tuesday- much to the delight of my family! If your summer dinner routine has hit a snag, maybe it’s time to bring back Taco Tuesday and delight your family too.


Bring back Taco Tuesday #summerfiesta


I wanted to keep dinner a surprise, so I headed to Publix by myself with the intention of buying the ingredients for good old fashioned beef and bean tacos. That’s when I noticed the Stand ‘n Stuff Taco shells dinner kit right beside their refried beans and green chilies that I normally buy. I knew these stand-alone shells would be a big hit with my girls, so in the cart they went, along with some avocados for guacamole.


 My WAHM Plan: Avocados from Mexico make tasty guacamole

As soon as I got home, I started making some guacamole with these beautiful avocados. I’m fortunate that my family loves the taste of this fruit! Of course we aren’t alone- did you know that Americans eat 1.4 billion pounds of guacamole a year?! Yeah, I was pretty blown away by that number myself.


I keep my guacamole recipe really simple and easy to follow by using ingredients and spices I have on hand like ground garlic, cumin, Adobo and fresh squeezed lime juice. I’ve found it I stick to this recipe, the guacamole will get gobbled up and used for more than just chip dipping,  We spread it on sandwiches, dip our carrots and peppers and more.


My WAHM Plan: freshly made Guacamole


Avocados do ripen really quickly, so I used all 5 of mine in this batch of guacamole. If your family won’t eat that much, you can store uncut avocados in the frig for a few days, or slice them and squeeze fresh lemon or lime juice on them to keep the avocado from browning. If you’d like to see some recipes for guacamole and other avocado dishes, just head on over to Avocados from MexicoMy guacamole tasted perfect with some Blue Corn tortilla chips I had on hand, so I set it in the frig to chill and got started on my stand’n stuff tacos.


My WAHM Plan: Taco Tuesday stand n stuff tacos

With the Old El Paso dinner kit that has shells, meat seasonings and taco sauce, my Taco Tuesday dinner was done in a flash. Besides cheese and sour cream, I make sure I serve tacos with lots of veggies- romaine lettuce, black olives, tomatoes, peppers, and more guacamole to help them be a bit healthier. 

When my family came to the dinner table, they couldn’t have been more surprised and delighted that I was serving tacos on Tuesday again. And the crunchy, easy to use stand n stuff shells were a huge hit!


My WAHM Plan: serve up a plate of crunchy tacos for dinner


If tacos aren’t your thing, you can find lots of quick and easy dinner recipes like Grilled Fajita Boats over at Old El Paso. They sound just as yummy as my tacos and I’m sure will be just as welcome at your next #summerfiesta dinner. 

Save!

From now, through the 19th, you can save on all Old El Paso products by shopping with Publix. Just upload, or print out the coupons at readysetsave.com to your loyalty card.


Win It:

My thanks to Old El Paso and Publix for sponsoring this $10 PayPal cash transfer giveaway! Entering is easy using the Rafflecopter form below.

Terms:
No purchase is necessary to enter using the Rafflecopter form.  My WAHM Plan is responsible for prize fulfillment. Winners will be notified by email used on entry form and have 48 hours to respond or another winner will be chosen.  This giveaway is not associated with nor endorsed by Facebook, Twitter, or any other social channel. 


Good luck!


a Rafflecopter giveaway
© My WAHM Plan · THEME BY WATDESIGNEXPRESS